Sunday, October 13, 2013

Adding OS definitions to Aerohive

In the default config, Aerohive has many OS objects. However, you will find that many are missing. In my install, I have found that all Blackberry devices were identified as Linux/unknown.

Fingerprints

First, we need to get the list of DHCP fingerprints:

In this file, we will find the blocks of the info we need to add to our OS object list.

OS objects

OS objects can be found in Configuration --> Advanced configuration --> Common objects --> OS objects. A full config can be exported in the form of a text file. In fact, I strongly suggest to have a look at the way it is formatted before adding or modifying anything. Once you are familiar with the format and ready to add a new definition, you can use Import function to do so.

In our case, we would like to add Blackberry to the list. In the online dhcp_fingerprints.conf, we find the following:
[os 1101]
description=RIM BlackBerry
fingerprints=<
56,6,1,3,15
1,3,6,15
EOT

We format it according to the format found in Aerohive:
OS=Blackberry
1,3,6,15
56,6,1,3,15
END

Now we can simply create a text file and import it into our config. Note however that there maybe conflicts in object definitions! When searching for Blackberry keyword in the dhcp_fingerprints.conf  you will find the following:
# 1,3,6,15 : 3 CONFLICTS with BlackBerry
[os 404]
description=OEMed Wireless Router
fingerprints=<
EOT

Of course this conflict will never appear unless we have such a device on the network and in our OS objects list. This could explain why Aerohive adds only most common objects in the default config.

Saturday, August 3, 2013

Fortigate - widget malfunction - multiple bugs

If you have tried to reconfigure/modify, add or move a widget and noticed that your action was not completed:
CFG_CLI_INTERNAL_ERR

Fortigate has confirmed that it is a bug in UI and in CLI. There are multiple bug reports associated with this case and it should be fixed in the next release.

Versions affected by these bugs: v5.0 patch release 2 and carried over to 3.
Fix expected: v5.0 patch release 4 which is still pending official release at this time

UPDATE from 19-08-2013: For me, it is confirmed that the bug was not fixed in the v5.0 patch release 4. Moreover, I see a clear slowdown in the authentication of Fortigate after applying the patch: the first call seems slower than before. While this patch fixes many bugs, more testing is needed.

UPDATE from 27-08-2013: The support insists that there are two widget types: "old" and "new" the old being available only through CLI. My experience differs: I have been able to reset to default all widgets and recreated the ones I need through GUI. I was able to successfully create and modify both "traffic history" and "interface history" types.
I have requested additional research on the topic but for now it looks like the support is a big disappointment. Is it just me or everyone feels that Fortinet support is not as good as it used to be? Often, they do not have the latest information, are not trained and have no idea on how to help you...

UPDATE from 28-08-2013: The support has totally ignored the fact that GUI worked as expected after a reset.  However, they did confirm that the widget named "traffic history" is the one that may be removed in the future patches as it is considered CPU intensive and was made available only because many customers have requested it.

Tuesday, May 28, 2013

Fortigate user monitor - Fixed bug #0193766

BUG: 0193766 (FSSO Auth users are not showing up in GUI).

According to Fortinet support, the issue with authenticated users not showing in the User Monitor will be fixed in the version 5.0.3.

UPDATE 03-08-2013: It was kind of fixed...
  • now we have to tick an option to see the list;
  • you cannot anymore deauth a user or all of them (if all users are FSSO type);
  • you cannot see the policy(ies) used by FSSO user, but you can filter based on these policies ???

Wednesday, March 13, 2013

Fortinet - Device Identity and Custom groups

Following documents from Fortinet, FortiOS 5 supports policies based on device groups.
Following support documents may be useful:
http://docs.fortinet.com/fos50hlp/50/index.html#page/FortiOS%25205.0%2520Handbook/Devices.067.02.html#ww1835612
http://docs.fortinet.com/fos50hlp/50/index.html#page/FortiOS%205.0%20Handbook/policies.031.11.html

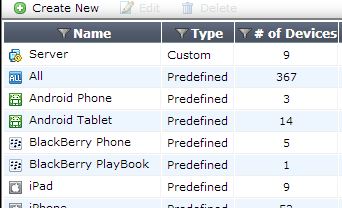
I have already blogged about my partial solution that employs some sort of the support for device based firewall rules. However, I have recently found that in Fortigate we can define our personal permanent groups.  That is, we can create a group called Servers that regroups different types of machines that will not be purged or cleaned automatically.
Note: At the moment, I do not know how much time it takes but I'm sure that the device list is automatically purged by Fortigate unit on a regular basis.
Custom device group functionality may be particularly useful in scenarios where some mix of clients and servers connect on the same port through Fortigate unit to internet or to some other internal service. In this scenario, we would like to make sure that our servers, VMs etc. are properly classified and allowed the access they are supposed to get not based on the devie type but rather on services they provide.

For example, one of my machines is a VM hosting all sorts of servers with different responsibilities (proprietary update services, print services, windows updates, rdp etc.). For this MAC address, I want all outgoing traffic to be allowed. Moreover, there are 4 MAC's associated with this machine: I want them all grouped under the same name. All this and some more can be achieved by using device groups.

In order to set a custom device group and regroup our special devices, we have to do the following:

  • User&Device --> Device --> Device Group  create a new group, let us call it Server. This group will be used to create a special rule for our servers.


  • User&Device --> Device --> Device Definition assuming that your server has already tried to access internet(for updates or other) it will be in the list. Find it and modify the entry by assigning it to a custom group. You could also use the same interface to associate multiple MAC`s belonging to the same machine. <


  • In Firewall rules you will be able now to use this group and assign special rules to this group.


Monday, March 4, 2013

Fortinet - client-less FSSO for AD

Following a relatively detailed reply from Fortinet support team it looks like a client-less FSSO needs the following:

  • AD credentials - to configure LDAP a user name/password set is needed with an ability to read from LDAP (a normal user should do). With Win Server 2003 there may be some anomalies with limited user accounts.
  • LDAP - should be configured for each DC, the same credentials will be used to do the pulling.
  • Pulling - by default pulling occurs every 10 seconds, but may be configured for an interval from 1 to 30 sec. Also, ports 8000 and 445 need to be open.
According to support, the behavior is a bit different from classic config. Assuming that the interval is 10sec and a user has logged in just after pulling has occurred. If we assume that in the next 9 seconds the system or the user tries to access Internet, the IP will be classified as guest. Once the pulling passed the IP will be reclassified according to the logs in the DC.

Fortinet considers that client-less method is better for 1-3 DC's but they still think that a collector agent is the best choice for a config with more than 3 DC's.

Saturday, March 2, 2013

Firewall Guru: Enhanced Single Sign-On to Windows AD in FortiOS 5...

Sebastian reports that:
Firewall Guru: Enhanced Single Sign-On to Windows AD in FortiOS 5...: FortiOS 5.0 brings with it an enhancement to how single sign-on can be performed in a Microsoft Active Directory environment. In prior ver...

While I have seen the same info in the official guide, I'm not sure that this does work properly. I will try to see with Fortinet support team how this is different from collector agent.

UPDATE: I got a reply from Fortigate see my next post in the blog

3. Partial solution

Given our setup and limitations we have discussed previously, we have decided to use a neat feature available in Aerohive and separate the traffic at the entry point.

Aerohive setup


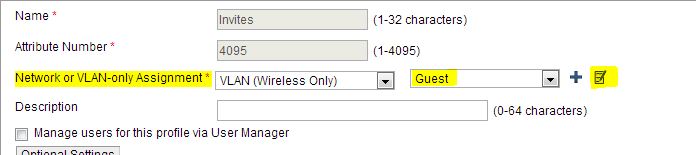
In Aerohive, we have configured a VLAN per user profile that we want to reroute. To do this, we have set a vlan for each user profile connecting to our wireless: Configuration --> Policy Configuration --> User Profiles.

Once the VLAN is assigned on Aerohive, it needs to be properly forwarded and redirected through all the switches all the way up to Fortigate unit. All traffic from this VLAN will end on Fortigate at a separate port from internal traffic effectively isolating these users from the rest of the network.

This means that Fortigate should be responsible for DHCP and DNS. But before we get there we need to make sure that Aerohive firewall allows this connection.


In Aerohive we need to allow access to our DNS/DHCP - GatewayGuest (The same as Fortigate IP on this VLAN- see the settings bellow). We also may need to allow access to some of our internal websites -DMZ.  We need to make sure that guest devices cannot communicate between them(hack each other etc.) - we therefore block all other internal IP access - 192.168.0.0/255.255.0.0 - Block. Finally we allow all other communication (last line in the picture above). Since the rules are processed from top to bottom this scenario works as we have intended.

Fortigate setup


As I have mentioned earlier, the traffic from this special VLAN will directly arrive at Fortigate unit and is completely isolated from the rest of the network. Thus we will use a built-in features in Fortigate in order to give this users access to DHCP/DNS and maybe to our DMZ.

Port set-up

First, let's look at port setup. Go to Network --> Interface --> PortXX (where XX is the port number that will receive all the traffic).
  
As we can note in the picture above, we need to setup: 
  • the name of the port - PORT_NAME,
  • a virtual domain that this port will belong to, if any
  • addressing mode should be manual (default) - because our unit will be serving DHCP it cannot get an IP from someone else,
    • IP/Mask should be in the same subnet as the ones in DHCP and it is the same as GatewayGuest set in Aerohive
  • the only Admin Access we allow is ping, but for hardened security even this can be deactivated,
  • DHCP server - enable
    • set the range and the mask for IP's that can be assigned to the clients
    • Default Gateway - same as interface unless you have a specific reason to set it up to something else
    • DNS Server - specify the same address as the IP set in Addressing mode - this will forward all DNS requests through Fortigate and will help us redirect internal traffic directly to DMZ
  • Enable device detection in Device Management - this will help us set policies per device type.
No we need to configure appropriate FireWall rules and DNS.

DNS

If the port we have configured above was assigned to a VDOM then inside VDOM look for System-->Network-->DNS Server.
First configure a DNS Database:

Back on the page of DNS configuration (System-->Network-->DNS Server), in the DNS Service on Interface create new DNS service as  Recursive. It is possible that Recursive option will not be available if you haven't set-up DNS Database. In this case, you will have the only available option Forward to System DNS.

FireWall


Now we need to configure our firewall rules. We will need to create at least two rules:

  1. A rule forwarding traffic from the port we setup above to the port connected to WLAN.
  2. If required, a rule forwarding traffic to DMZ.
The first rule, from our port to the WLAN should be set-up according to your internal config but the following image may help.
Since at this moment we know for sure that traffic coming for this rule is not identifiable and may never be, we can at least work with device types and provide some granular security. At the moment Fortinet offers following categories:
Similarly, if we decide to setup WebQuota categories for some or all devices, it will work per device IP address. While it is not the same as to have per user name quota it is better than having none at all.

Final thoughts: I may be adding more details to DNS setup but. for now. I hope that everyone struggling like me will have enough information to have the above described config setup on their devices.